Setups
The online tutor audio setup, layer by layer
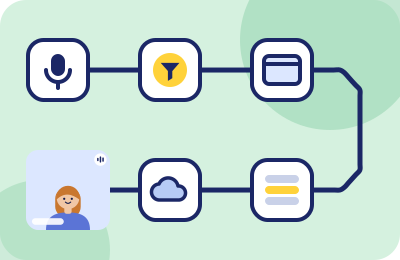
Between your voice and your student's ears sit five pieces of software, each with its own settings, each capable of quietly sabotaging the other four. Set them up once, in order, and lesson audio stops being a thing you think about.
The chain, drawn once
Nearly every marketplace lesson — Preply, italki, Cambly and the rest — happens in a browser-based classroom. That means your audio passes through, in order:
- The operating system — which microphone is the system default, and at what input level.
- Your suppression layer (optional) — Krisp or similar, presenting itself as a virtual microphone.
- The browser — which needs permission to use a microphone at all, and applies its own default processing.
- The classroom's device picker — where the platform asks which microphone to use for this lesson.
- The platform's pipeline — its codecs, its connection quality, its processing.
Nine out of ten "my student can't hear me properly" incidents are a disagreement between two of these layers — usually layers 1 and 4 pointing at different microphones. The setup below exists to make disagreement impossible.
Layer 1: the operating system
Open your OS sound settings and look at the input list. Two rules:
- Know your device names. Laptops accumulate phantom inputs — the built-in array, a webcam mic, yesterday's earbuds still paired. Identify which entry is the microphone you actually teach with, because you'll be choosing it by name twice more down the chain.
- Set the input level once, at lesson volume. Speak as you teach — which for most tutors is louder than conversation — and set the level so the meter peaks comfortably below the top. A too-hot input distorts, and no suppression tool downstream can un-distort you. A too-quiet one makes students crank their volume, which amplifies every noise you do leak.
If your OS offers its own "voice mode" or mic processing, decide deliberately whether it's on or off — and if you add a dedicated suppression layer next, switch the OS processing off. Two AI filters arguing over the same signal produce that watery, warbling artifact students describe as "you sound like you're underwater."
Layer 2: the suppression layer (if you need one)
Whether you need this layer at all is the subject of the main guide — short version: quiet room, skip it; household with humans, you probably want it. If you run one:
- Install it before touching the classroom settings, so its virtual device exists when the platform enumerates microphones.
- In the tool, select your physical microphone as its input. The tool then publishes its own device — Krisp calls it Krisp Microphone — which is what everything downstream should use.
- Keep exactly one suppression stage active: the tool's, not the tool's plus the OS's plus maximum browser processing. Stacked filters degrade consonants, and consonants are your product.
Layer 3: the browser
Browser classrooms can only use a microphone the browser is allowed to touch. This is the layer behind the classic first-lesson panic — the classroom shows a dead meter and the clock is running:
- When the platform first asks for microphone access, the browser shows a permission prompt. Allow it — a denied prompt is remembered, silently, forever, until you dig it out of site permissions.
- Check the address-bar site settings for your platform and confirm the microphone permission is "Allow," and that the browser's chosen device matches your intended one (the virtual mic if you run one, the physical one if not).
- Mind platform browser support: Preply recommends Chrome (latest Opera, Safari and Edge also supported); Cambly requires tutors to use Chrome on a desktop or laptop outright; italki's classroom likewise runs best in mainstream browsers, and its lesson-recording feature works only in Chrome, Edge and Firefox. All checked 2026-09-20. When a platform says Chrome, believe it — "it worked in my other browser" is a sentence with a body count.
Layer 4: the classroom's device picker
Every serious teaching platform fronts its classroom with a device check — Preply has a pre-lesson connection and device test, italki shows a setup screen where you test microphone, camera and speakers before entering. This picker is the layer that actually decides which microphone your student hears. The routine:
- Open the device check a few minutes before the booking, not at :00.
- Select your intended microphone by name — the virtual one if you run suppression. "Default" is not a name; it's a delegation to whatever the OS believes today.
- Watch the meter while saying a full sentence at teaching volume. A meter that flickers on plosives but dies mid-sentence means the wrong device is selected somewhere upstream.
- Close anything else that might hold the microphone. Preply's own troubleshooting says it plainly: don't keep other apps that use the mic open in parallel. A meeting app idling in the tray counts.
Layer 5: the pipeline (know when it's not you)
When audio is choppy, robotic, or cutting out, stop adjusting microphones — that's the connection, not the signal. Platforms publish their own diagnostics: Preply documents ideal packet loss for its classroom at 0–2% and offers a connection test; if your numbers are worse, the fix lives in your network (move closer to the router, drop other streams, teach wired if you can), not in any settings menu. Suppression software cannot reassemble packets that never arrived — and neither, for the record, can turning it off, however tempting the superstition.
The five-minute pre-lesson ritual
Once the chain is set, maintenance is five minutes before the first lesson of the day — not before every lesson:
- Device check in the platform: right mic by name, meter moves on a full sentence.
- Suppression layer running and pointed at the physical mic (if you use one).
- Nothing else holding the microphone.
- One glance at connection quality if the platform surfaces it.
- Water within reach. Not software, still audio advice.
Trial lessons deserve the full ritual every time — they're auditions, and audio is the first thirty seconds of the audition. For everything platform-specific, see the notes for Preply, italki and Outschool.
If you add one layer, add it properly
Krisp installs in minutes and slots into the chain exactly as described above — its 7-day trial is enough to run the full setup and a real week of lessons. Setup details for teachers, verified pricing and the honest limitations list live in Krisp for online teachers.
Rule 1 in action (Classroom Rules): this button is a paid link. If a Krisp subscription follows it, Krisp pays ChalkLine for the introduction, and what you pay stays exactly what krisp.ai charges anyone. It buys the coffee, not the verdicts.